HAWX PEST CONTROL
DIY GUIDE TO RODENT REMOVAL
Health Hazards • Safe Removal • Sanitation & Prevention

WARNING: Always wear PPE before handling rodents, droppings, or nesting materials. Rodents carry serious diseases.
Table of Contents
Click any section below to jump directly to that content
Main Sections
Individual Guide Sections
Expert guidancethroughout: Every section includes detailed prevention tips, step-by-step removal guides, product recommendations, and professional best practices.
Before You Start: Know When to Call a Professional
Before attempting any DIY rodent removal, review the situations below. If any of these apply to your home, skip the DIY steps and contact HAWX Pest Control directly for a professional assessment.
Droppings found in multiple rooms
Suggests a large, established population beyond DIY scope.
Sounds in walls or attic with unclear entry points
Professionals have inspection cameras and tools to access hidden areas.
2-3 weeks of trapping with no improvement
Indicates the population is larger than DIY methods can keep up with.
Gnawed electrical wiring discovered
Fire hazard. Stop and call immediately.
Rodents in HVAC or ductwork
Can spread disease throughout the home via airflow. Requires professional remediation.
Rat infestation (not mice)
Rats are harder to trap, more aggressive, and often signal a structural access problem.
Dead rodents in inaccessible areas
Decomposition inside walls leads to odor, flies, and contamination.
Anyone in the home is immunocompromised, pregnant, or has respiratory conditions
Droppings and urine carry serious pathogens; cleanup requires professional protocols.
Having Any of These Issues? Call Hawx for a Same-Day Inspection.
(855) 739-0061Section 1: What You Need & Estimated Costs
Before you begin any rodent removal project, gather all required materials in advance. Having everything on hand before entering a contaminated space reduces the risk of mid-task PPE removal, a common cause of accidental exposure. The costs below are typical retail estimates; prices vary by region and supplier.
1.1 Personal Protective Equipment (PPE)
| Item | Qty Needed | Est. Cost | Where to Buy |
|---|---|---|---|
| N95 Disposable Respirator (box of 10) | 1 box (min.) | $15 – $25 | Home Depot, Lowe's, Amazon |
| P100 Full-Face Respirator (attic use) | 1 (reusable) | $30 – $60 | Safety supply stores, Amazon |
| Nitrile Disposable Gloves, 5 mil (box of 100) | 1 box | $12 – $18 | Walmart, Costco, Amazon |
| Heavy Rubber Outer Gloves (chemical-resistant) | 1 pair | $8 – $15 | Home Depot, hardware stores |
| Disposable Tyvek Coverall Suit | 2–3 suits | $8 – $15 each | Amazon, safety supply stores |
| Sealed Chemical Splash Safety Goggles | 1 pair | $10 – $25 | Home Depot, Lowe's, Amazon |
| Disposable Boot Covers / Booties | 4–6 pairs | $8 – $12 / pack | Amazon, janitorial supply |
1.2 Trapping & Removal Equipment
| Item | Qty Needed | Est. Cost | Where to Buy |
|---|---|---|---|
| Victor Easy Set Snap Traps — Mouse (12-pack) | 1–2 packs | $8 – $12 | Home Depot, Walmart, Amazon |
| Victor Power Kill Snap Traps — Rat (4-pack) | 1–2 packs | $10 – $16 | Home Depot, Lowe's, Amazon |
| Heavy-Duty Contractor Garbage Bags, 6 mil (box) | 1 box (20–25 bags) | $18 – $30 | Home Depot, Lowe's |
| Standard Zip-Lock Plastic Bags (gallon size) | 1 box | $5 – $8 | Any grocery or general store |
| Headlamp / Work Light (hands-free) | 1 | $15 – $35 | Hardware stores, Amazon |
1.3 Sanitation & Decontamination Supplies
| Item | Qty Needed | Est. Cost | Where to Buy |
|---|---|---|---|
| Household Bleach (5.25–8.25% sodium hypochlorite) | 1–2 gallons | $5 – $10 | Any grocery store |
| Trigger Spray Bottles (32 oz) | 2–3 bottles | $5 – $10 | Dollar store, Walmart |
| Lysol Disinfectant Spray, Hospital-Grade (2-pack) | 1–2 cans | $10 – $18 | Walmart, Target, Amazon |
| Paper Towels — Heavy Duty (6-roll pack) | 1–2 packs | $8 – $15 | Any store |
| HEPA Vacuum (or HEPA filter bags for existing vacuum) | 1 (if available) | Bags: $10–$20 / Unit: $80–$250+ | Home Depot, Lowe's, Amazon |
| Antibacterial Hand Soap & Hand Sanitizer (70%+ alcohol) | 1 of each | $5 – $12 total | Any store |
1.4 Exclusion & Sealing Materials
| Item | Qty Needed | Est. Cost | Where to Buy |
|---|---|---|---|
| Steel Wool, Grade 00 (large pad pack) | 1–2 packs | $6 – $12 | Home Depot, hardware stores |
| Copper Mesh — Stuf-Fit or equivalent (20 ft roll) | 1 roll | $15 – $25 | Amazon, pest control supply |
| 1/4" Hardware Cloth / Galvanized Wire Mesh (10 ft roll) | 1–2 rolls | $20 – $40 | Home Depot, Lowe's, farm supply |
| Expanding Polyurethane Foam (e.g., Great Stuff) | 2–3 cans | $7 – $12 each | Home Depot, Lowe's, Walmart |
| Silicone Caulk & Caulking Gun | 2–4 tubes + 1 gun | $15 – $30 total | Home Depot, Lowe's |
1.5 Total Estimated Project Cost Summary
| Category | Budget DIY | Full / Recommended |
|---|---|---|
| Personal Protective Equipment | $45 – $75 | $100 – $160 |
| Trapping & Removal | $20 – $40 | $50 – $80 |
| Sanitation & Cleaning Supplies | $30 – $55 | $60 – $120 |
| Exclusion & Sealing Materials | $30 – $60 | $80 – $140 |
| TOTAL ESTIMATED PROJECT COST | $125 – $230 | $290 – $500 |
Note: "Budget DIY" reflects minimum viable supplies for a small mouse infestation. "Full / Recommended" includes complete PPE upgrades (P100 respirator, Tyvek suits), HEPA vacuum bags, and full exclusion materials. Costs for attic insulation decontamination that requires insulation removal are not included and can range from $3,000 to $10,000+, depending on the scope. Professional remediation is strongly recommended in these cases.
Unsure about moving forward? Call Hawx to Schedule Your Inspection!
(855) 739-0061Introduction
Rodents (house mice (Mus musculus), Norway rats (Rattus norvegicus), and roof rats (Rattus rattus)) are far more than a nuisance. A single mouse can produce up to 70 droppings per day and urinate continuously as it travels, contaminating every surface it touches. Left unchecked, a pair of mice can multiply to over 200 individuals within just a few months.
This guide is designed to help homeowners safely identify, remove, and prevent rodent infestations with a strong emphasis on proper sanitation and personal protection. Because rodents are significant disease vectors, cutting corners on health and safety protocols is not just irresponsible; it can be genuinely life-threatening.
IMPORTANT DISCLAIMER
This guide is intended for minor infestations of fewer than 5 rodents. If you discover extensive evidence of infestation do NOT attempt DIY removal.
Contact HAWX Pest Control immediately for a professional assessment. Severe infestations may involve hantavirus-contaminated materials that require certified biohazard remediation.
Section 2: Health Hazards of Rodents in Your Home & Attic
Understanding the health risks posed by rodents is essential before you begin any removal efforts. Rodents are among the most prolific disease carriers in the animal kingdom, and many of these diseases can be contracted simply by breathing in contaminated air.
2.1 Diseases Transmitted by Rodents
| Disease / Pathogen | Transmission Route | Rodent Carrier | Severity |
|---|---|---|---|
| Hantavirus Pulmonary Syndrome (HPS) | Inhaling dust from urine/droppings/nesting | Deer mouse, White-footed mouse | CRITICAL — 38% fatality rate |
| Salmonellosis | Contaminated food/surfaces via droppings | All common rodents | HIGH — can be severe in vulnerable individuals |
| Leptospirosis | Contact with urine-contaminated water or soil | Rats | HIGH — can cause organ failure |
| Rat-Bite Fever | Bite, scratch, or contaminated food | Rats, mice | HIGH — untreated can be fatal |
| Lymphocytic Choriomeningitis (LCMV) | Inhaling/ingesting infected urine or droppings | House mouse | MODERATE-HIGH — severe neurological risk |
| Plague (rare, regional) | Fleas on rodents biting humans | Wild rodents | CRITICAL without treatment |
| Rickettsia (Murine Typhus) | Fleas and mites from infected rodents | Rats | MODERATE — treatable if caught early |
| Tularemia | Contact with infected animals or their environment | Wild rodents | HIGH — can be fatal |
2.2 Special Danger: Attic Infestations
Attics present a uniquely dangerous environment for DIY rodent removal. Due to limited airflow, droppings and urine accumulate over time, creating extremely high concentrations of aerosolized pathogens. When insulation soaked with rodent waste is disturbed — by vacuuming, sweeping, or simply walking through — microscopic virus particles become airborne and can be inhaled instantly.

HANTAVIRUS ALERT — Read Before Entering Your Attic
Hantavirus can survive in dried rodent droppings for days to weeks. There is NO specific treatment or vaccine, prevention is your ONLY protection.
NEVER vacuum, sweep, or use a leaf blower on rodent droppings. This instantly aerosolizes the virus.
NEVER enter an infested attic without an N95 or higher respirator (P100 full-face preferred), disposable gloves, and protective clothing.
If you find extensive droppings, dead rodents, or nesting material covering a large area, call a professional.
2.3 Secondary Health Hazards
| Secondary Hazard | Source | Health Impact |
|---|---|---|
| Allergens & Asthma | Dander, urine proteins, droppings | Triggers severe asthma attacks; linked to childhood asthma development |
| Ectoparasites | Fleas, ticks, and mites from rodents | Transmit Lyme disease, murine typhus, and other pathogens to humans and pets |
| Electrical Fire Risk | Rodents chew wiring insulation | House fires — rodents cause an estimated 25% of fires with unknown origins |
| Food Contamination | Droppings, urine, and saliva on food | Salmonellosis, leptospirosis — entire pantries may need disposal |
| Structural Damage | Gnawing on wood, pipes, insulation | Water damage and mold growth, which carries its own serious health risks |
| Psychological Stress | Sounds, sightings, fear of contamination | Anxiety, sleep disruption, documented mental health impacts in prolonged cases |
Section 3: Identifying Your Rodent Problem
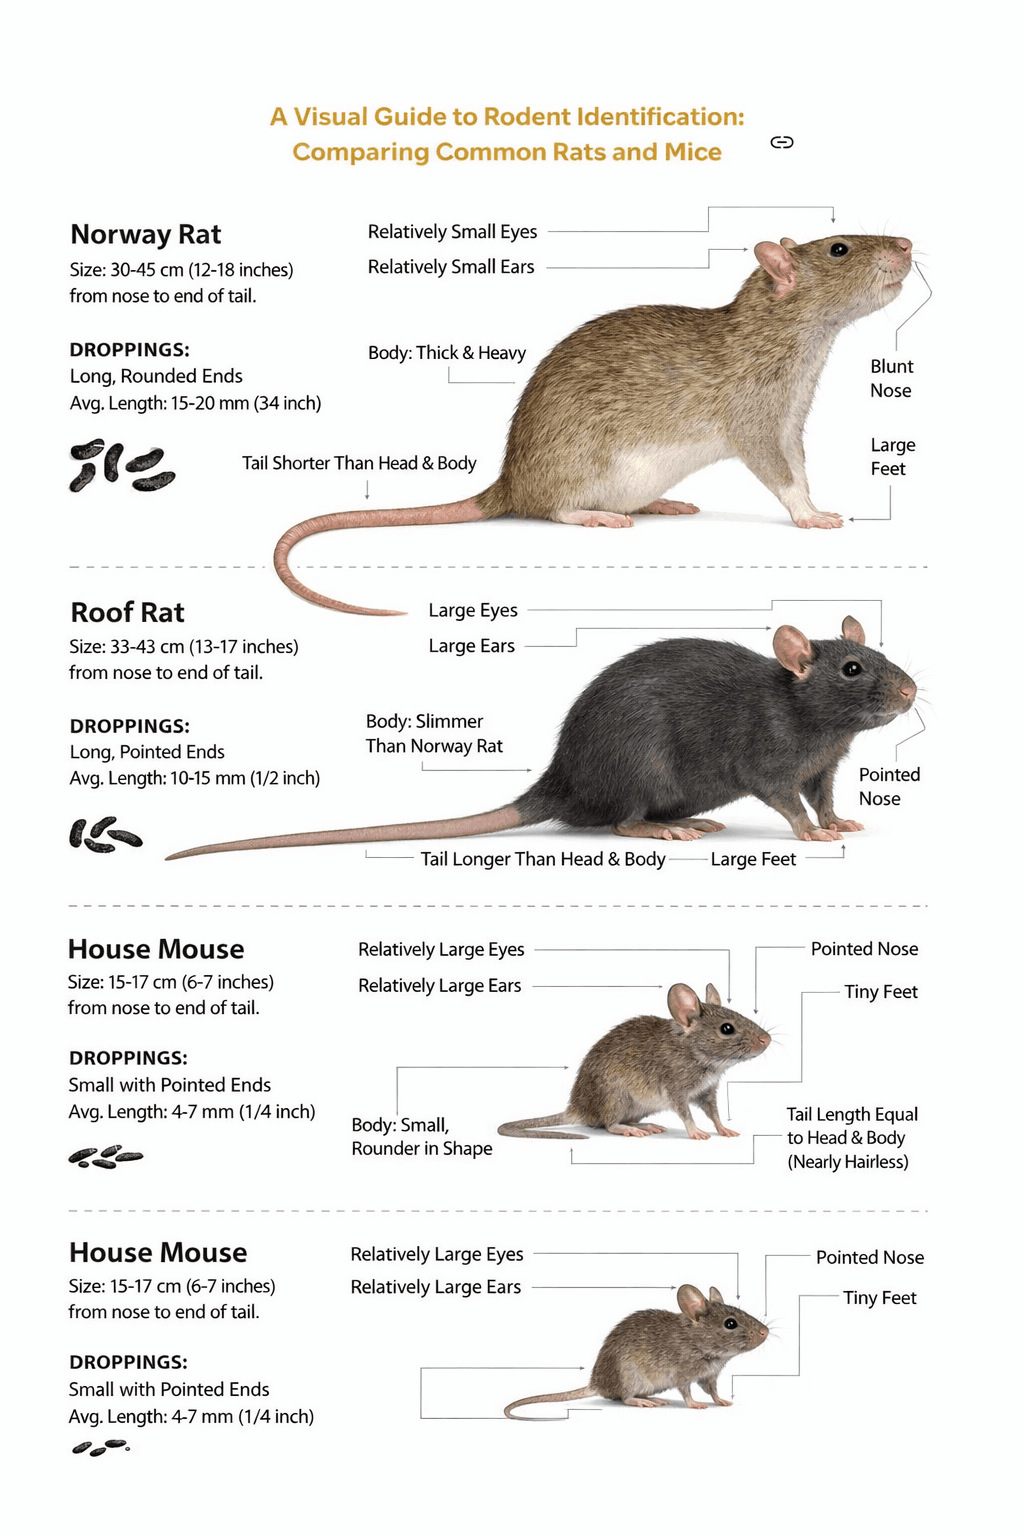
Before selecting a removal strategy, correctly identify the type and extent of infestation. Treatment methods vary significantly between mice and rats, and between a minor incursion and a full-blown colony.
3.1 Signs of Infestation
| Sign | What to Look For |
|---|---|
| Droppings | Mice: dark, rice-grain sized (3-6mm). Rats: capsule-shaped, larger (12-20mm). Fresh droppings are dark and moist; old droppings are gray and crumble. |
| Gnaw Marks | Rough, irregular edges on wood, plastic, food packaging, or wiring. Rats leave larger, rougher marks than mice. |
| Tracks & Runways | Greasy smear marks along walls and baseboards (from oils in their fur). Look for tiny footprints in dusty areas. |
| Nesting Materials | Shredded paper, fabric, insulation, or plant material gathered into a ball in dark, warm spaces. |
| Sounds | Scratching, squeaking, or scurrying sounds, especially at night (mice) or both day and night (rats in severe infestations). |
| Odors | A strong, musky, ammonia-like smell indicates a significant infestation. The odor intensifies in enclosed spaces like attics and wall voids. |
| Burrows | Rats dig burrows near foundations, under debris, or along garden borders. Fresh burrows have smooth, compacted openings. |
3.2 Mouse vs. Rat: Key Differences
| Characteristic | House Mouse | Norway / Roof Rat |
|---|---|---|
| Body Size | 2-4 inches body length | 12-19 inches body length |
| Droppings | 3-6mm, pointed ends | 12-20mm, blunt ends |
| Entry Hole Size | Gap as small as 1/4 inch | Gap as small as 1/2 inch |
| Preferred Habitat | Inside walls, cabinets, attics | Basements, sewers, burrows (Norway), attics, trees (Roof) |
| Active Hours | Primarily nocturnal | Primarily nocturnal, more cautious than mice |
| Trap Type | Small snap traps; glue boards | Large snap traps; live cage traps |
| Neophobia (fear of new objects) | Low — will investigate quickly | HIGH — may take days to approach traps |
Section 4: Essential PPE & Health Safety Protocols
This is the most critical section of this guide. Proper personal protective equipment (PPE) and sanitation procedures are NOT optional. These protocols are the difference between a safe DIY project and a potentially fatal exposure to zoonotic disease.
4.1 Required Personal Protective Equipment (PPE)
Assemble ALL of the following items before beginning any inspection, removal, or cleaning activity:
| PPE Item | Minimum Standard | Recommended Upgrade |
|---|---|---|
| Respiratory Protection | N95 disposable respirator (properly fitted) | P100 full-face respirator — mandatory for attic cleanup |
| Hand Protection | Disposable nitrile gloves (at least 5 mil thick) | Double-glove: nitrile under rubber; replace immediately if torn |
| Eye Protection | Safety glasses with side shields | Sealed chemical splash goggles — required in attic/crawlspace |
| Body Protection | Long sleeves and pants (to be immediately laundered) | Disposable Tyvek coverall suit — discard after use |
| Foot Protection | Rubber boots or dedicated work boots | Boot covers / disposable boot booties over work boots |
| Head Protection | Hat or cap (launder immediately after) | Tyvek hood attached to coverall — required in heavy contamination |
4.2 PPE Donning & Doffing Procedure
Contamination most commonly occurs during removal of PPE. Follow these procedures carefully every time.
DONNING (Putting ON before entering contaminated area)
- Wash hands thoroughly with soap and water for at least 20 seconds.
- Put on Tyvek coverall (or dedicated work clothes) and zip/seal completely.
- Put on inner gloves (nitrile). Seal sleeves of coverall over glove cuffs with tape if available.
- Fit and seal respirator (N95 or P100). Perform a fit check: inhale sharply — mask should pull in; exhale — no air should leak around edges.
- Put on goggles / eye protection.
- Put on outer rubber gloves. You are now ready to enter the contaminated area.
DOFFING (Taking OFF after leaving contaminated area)
- Spray outer gloves with disinfectant before touching anything else.
- Remove goggles by pulling from the back strap — do not touch the front surface.
- Remove coverall by rolling it downward and inward, turning it inside out as you step out. Place directly into garbage bag.
- Remove inner nitrile gloves by the wrist, peeling them inside out. Place in garbage bag.
- Remove respirator by the straps only — do not touch the front filter surface.
- IMMEDIATELY wash hands and face with soap and water for at least 20 seconds. Apply hand sanitizer after drying.
Section 5: Step-by-Step Rodent Removal Process
With your PPE assembled and health protocols understood, you are ready to begin the removal process. Work methodically through each phase.
Phase 1: Ventilate the Area
Before entering any enclosed space with evidence of rodent activity, open windows and doors and allow the space to ventilate with fresh air for a minimum of 30 minutes. This allows airborne particles to settle and disperses some pathogen concentration. Do NOT use fans that blow air toward you or back into living spaces.
Phase 2: Inspection & Mapping
Wearing full PPE, systematically inspect the entire affected area. Document your findings:
- Location and approximate quantity of all droppings
- Nesting site locations
- Gnaw marks and entry/exit points
- Food sources that may be attracting rodents
- Areas of potential re-entry from outside
Phase 3: Trapping Strategy
HAWX recommends snap traps as the primary removal method. They are effective, inexpensive, and do not pose the secondary poisoning risks of rodenticide baits (which can harm children, pets, and wildlife). Glue traps are discouraged due to animal welfare concerns and risk of escape with pathogen spread.
Rodenticide Bait Safety Warning
Second-generation anticoagulant rodenticides (SGARs) such as brodifacoum are extremely dangerous and are BANNED for residential use in many states. They cause secondary poisoning in owls, hawks, foxes, and household pets that eat poisoned rodents.
If you choose to use any bait products, use ONLY first-generation baits (warfarin, chlorophacinone) in tamper-resistant bait stations, placed ONLY in locations completely inaccessible to children and non-target animals.
HAWX strongly recommends mechanical snap traps for DIY use over any rodenticide product.
Trap Placement Guidelines:
- Place traps perpendicular to walls with the trigger end touching the wall — rodents run along walls and will trigger the trap naturally.
- Set traps every 2-3 feet along active runways (areas with droppings or grease marks).
- Bait with peanut butter, chocolate, nesting materials (cotton balls), or dried fruit. Use a pea-sized amount only — too much bait can be taken without triggering the trap.
- For rats: Pre-bait unset traps for 2-3 days first. Rats are highly neophobic and will avoid new objects until comfortable. Set the traps only after they have been feeding.
- Check and reset traps daily. Leaving a dead rodent in a trap for more than 24 hours significantly increases disease and fly/insect risk.
- Place a minimum of 6-12 traps for a small mouse infestation; 3-6 large traps for rats.
Phase 4: Safe Disposal of Dead Rodents
- Put on full PPE before approaching any trap or dead rodent.
- Spray the dead rodent and surrounding area generously with an EPA-registered disinfectant or a freshly mixed 1:10 bleach solution (1 part bleach to 10 parts water). Allow to soak for 5 full minutes.
- Pick up the rodent with a paper towel or disposable rag — do NOT pick it up with bare hands even while gloved.
- Place the rodent and the paper towel into a sealed plastic bag. Place that bag into a second bag and seal again (double-bag method).
- Disinfect the trap and reset, or discard the trap if disposable.
- Spray and wipe the surrounding area again with disinfectant.
- Discard the sealed bag in an outdoor trash receptacle with a tight-fitting lid.
- Remove PPE following the doffing procedure (Section 4.2) and wash hands immediately.
Never Handle a Live Rodent
If you find a live rodent in a trap, do NOT attempt to handle it. Live rodents are far more likely to bite when cornered. If using a live cage trap, transport the entire trap to a release site at least 1 mile from your home (rodents will return if released closer).
Release by opening the trap door from a distance — never reach inside. Disinfect the cage trap thoroughly before reuse.
Save Yourself Time & Get a Rodent Inspection from Hawx
(855) 739-0061Section 6: Sanitation & Decontamination Procedures
Trapping rodents eliminates the infestation, but the health risk does not end there. Rodent droppings, urine, nesting materials, and contaminated surfaces must be properly decontaminated. This phase is as important as the trapping phase and requires just as much care with PPE.
5.1 Approved Disinfectants
Not all cleaning products are effective against rodent-borne pathogens. Use only EPA-registered disinfectants with proven efficacy against hantavirus, Salmonella, and Leptospira. Use this EPA Pesticide Product Search to find the right product for your home: https://www.epa.gov/safepestcontrol/search-registered-pesticide-products
CRITICAL: Do NOT use a dry broom, vacuum, or leaf blower to clean up droppings. Dry sweeping launches virus particles directly into the air you breathe.
5.2 Step-by-Step Decontamination Procedure
Complete Decontamination Sequence — Follow in Order
STEP 1 — Ventilate
Open all windows and ventilate for 30 minutes before entering. Use cross-ventilation (air flows through and out, not back into living areas).
STEP 2 — Don Full PPE
Follow the donning procedure in Section 4.2. Do not enter the area without full PPE in place.
STEP 3 — Wet Droppings & Nesting Material
Using a spray bottle, thoroughly saturate all droppings, nesting materials, and contaminated surfaces with bleach solution or approved disinfectant. Spray from 6-12 inches away and avoid splashing. Allow 5-10 minutes of wet contact time.
STEP 4 — Wipe and Bag
Use paper towels or disposable rags to wipe up droppings and nesting material. Work from the outside edges inward to avoid spreading contamination. Place all materials directly into a sealed plastic bag as you work. Double-bag and seal tightly.
STEP 5 — Re-Spray and Wipe Surfaces
After removing bulk material, re-spray the entire area a second time and allow to soak for the full contact time. Wipe down with clean paper towels.
STEP 6 — Mopping (Floors)
Mop hard floors with a bleach or disinfectant solution. Replace mop water frequently. Dispose of mop water in a toilet or drain. Do not dispose outdoors where it could contaminate soil.
STEP 7 — HEPA Vacuuming (After Wet Cleaning Only)
Once all visible contamination has been wet-wiped and the area is visually clean, a HEPA vacuum may be used on hard-to-reach areas. HEPA filtration is required. Standard vacuum filters allow rodent allergens and viral particles to pass through the exhaust. Dispose of HEPA filter bags in sealed plastic bags.
STEP 8 — Laundry & Disinfection
All washable items (clothing, bedding, fabric coverings) that may have been exposed should be washed in hot water (minimum 160°F) and dried on high heat. Discard any items with heavy contamination — replacement is cheaper than illness.
5.3 Attic Decontamination Special Considerations
Attic decontamination is significantly more complex than other areas of the home and often requires professional remediation. However, for smaller, localized attic contamination, the following additional guidelines apply:
- Contaminated insulation MUST be removed — it cannot be effectively decontaminated in place. Bagged rodent-soiled insulation is considered potentially biohazardous waste.
- Wear P100 full-face respirator, full Tyvek suit, double gloves, and boot covers — no exceptions for attic work.
- Bag insulation in heavy-duty contractor garbage bags (6 mil minimum thickness). Seal tightly and label as "Rodent-Contaminated Material."
- After insulation removal, spray all wood surfaces (rafters, sheathing, joists) with bleach solution and allow to dry before installing new insulation.
- New insulation should be blown-in cellulose (which contains borate, a natural rodent deterrent) or new fiberglass batts.
- If HVAC ducts pass through the attic, have them professionally inspected and cleaned — contaminated air circulated through your home's ductwork poses a direct inhalation risk to all occupants.
Section 7: Exclusion — Sealing Entry Points
Exclusion is the single most effective long-term rodent control strategy. Trapping and cleaning address an existing infestation; exclusion prevents the next one. A mouse can fit through a gap the size of a dime. A rat needs only a gap the size of a quarter.
6.1 Common Entry Points
- Gaps around pipes, conduit, and wiring where they enter through walls or the foundation
- Gaps where the roof edge meets the fascia board (roof rats are excellent climbers)
- Soffit vents without intact, fine-mesh screening
- Gaps around HVAC lines entering the home
- Foundation cracks and gaps, especially near the soil level
- Around garage door edges (worn weatherstripping)
- Dryer vents and bathroom exhaust vents without proper flap closures
- Any gap larger than 1/4 inch (mice) or 1/2 inch (rats) in the building envelope
6.2 Sealing Materials
| Material | Best Used For | Notes |
|---|---|---|
| Steel wool (Grade 00) | Stuffing into gaps around pipes | Rodents cannot chew through steel wool. Must be secured with caulk to stay in place. |
| Hardware cloth (1/4" mesh, galvanized) | Covering vents, large openings | The gold standard for large openings. Rodent- and bird-proof. |
| Copper mesh (e.g., Stuf-Fit) | Stuffing gaps, pipe penetrations | Rust-proof alternative to steel wool. More durable long-term. |
| Expanding polyurethane foam | Final seal OVER steel wool/mesh only | NOT a standalone solution — rodents easily chew through foam alone. |
| Rodent-resistant caulk (silicone or polyurethane) | Sealing seams, cracks, and gaps | Use silicone for areas exposed to moisture. Add steel wool first in larger gaps. |
| Metal flashing (26-gauge galvanized) | Around door/window frames, sill plates | Requires screws or nails. Completely impenetrable when properly installed. |
Section 8: Long-Term Prevention Practices
The best pest control is making your home an unattractive target. Integrate these practices into your regular home maintenance routine:
7.1 Food Storage & Sanitation
- Store all dry foods (grains, cereals, pet food, birdseed) in rigid, airtight containers made of glass, metal, or heavy-duty plastic. Cardboard boxes offer no protection.
- Clean up all food debris and spills immediately. Mice can survive on 3-5 grams of food per day; crumbs are a buffet.
- Do not leave pet food out overnight. Schedule feedings and store pet food in sealed metal containers.
- Take out the garbage daily and use trash cans with tight-fitting, lockable lids.
- Compost bins should be sealed, rodent-resistant designs. Never compost meat, fish, or dairy products.
- Clean behind and under appliances (refrigerators, stoves, dishwashers) regularly.
7.2 Exterior Environment
- Keep firewood stacked at least 18 inches off the ground and 12 inches away from your home's exterior.
- Eliminate dense vegetation, leaf piles, and debris within 18 inches of the foundation; these are prime harborage areas.
- Trim tree branches so they do not overhang or touch the roof (roof rat highway).
- Eliminate standing water sources.
- Bird feeders attract rodents. If you use them, place them on pole-mounted baffles and clean up seed spills daily.
- Consider motion-activated lights in areas around the foundation to reduce the darkness that rodents prefer.
7.3 Ongoing Monitoring
- Conduct a monthly walk-through inspection of attic, basement, garage, and crawl spaces for signs of rodent activity.
- Check all exclusion seals seasonally — expanding and contracting temperatures can reopen gaps.
- Keep 1-2 unset snap traps in key locations year-round as monitoring stations. If you catch something, you know activity has resumed.
- Schedule a professional inspection with HAWX Pest Control annually. Prevention is far less expensive than remediation.
Section 9: Call a Professional
If you have tried everything and are still seeing rodents, it's time to call a professional. DIY methods are appropriate only for minor, isolated infestations. At Hawx Pest Control, we inspect your home from top to bottom, seal entry points, and remove all rodents to ensure they won't come back. Call today to start your inspection.
Call Now for a Same-Day Inspection!
(855) 739-0061